L Squared
Member
- Time of past OR future Camino
- Camino Portugues (2021)
Camino Frances (April 17, - May, 15, 2015)
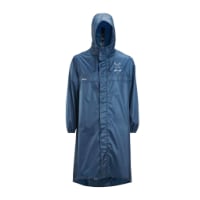
I purchased Ferrino Trekker rain gear knowing it would not be perfect for the Camino, but prepared to make modifications tailored to the needs of the Camino. I was considering the Altus, Trekker, Packa and the Sea to Summit Sil-Nylon poncho. Originally I was going to pick up an Altus when I got to Spain but then decided I wanted to actually have it before I arrived in Spain so that I could test it out and get familiar with it. The Trekker, Packa and Sea to Summit were available to order easily from the USA. After a little more research I decided the Sea to Summit being a true poncho was not what I wanted. The Packa was really appealing, and I thought about getting it and adding some length to it. But thought since it was already so expensive it seemed kind of silly to make changes to it. So I settled on the Ferrino Trekker. The problems with the Trekker seemed like something that I would be able to modify without much cost and without changing the overall look and function other to improve it. So I purchased the Ferrino Trekker from Amazon. It arrived in 3 days and I got started on the modifications.
I had been reading a thread on the Camino de Santiago Forum on “Italian brand poncho, starts with F ... anyone know the brand??” and got to a posting by t2andreo which described the “perfect” rain-gear. It seemed the Trekker included many of the features but was missing out on armpit zippers and a two way zipper for the front closure. It also seemed that good torso ventilation was required for the “perfect” rain-gear and after seeing the Trekker it seemed the ventilation at the front torso could be improved. I also thought the wrists closure should be capable of being totally open or else cinched tight during a downpour. The Trekker had elastic around the wrists as well as Velcro to cinch them tight. But in the open condition they weren't as open as they could be if the elastic was removed. So an additional improvement was to insert an elastic cord with a small clamp so that it could be cinched tight or be totally loose and open at the bottom of the sleeves.
I started with the torso ventilation and wrist ventilation first. The torso vents on either side of the chest are ~8” long on each side but the middle 1/3 was sewed closed leaving just two small vents on each side of the chest. I removed the stitching closing the middle 1/3 of each vent and instead sewed in a 1 1/2 inch piece of Velcro. This would allow me to close the vent or else totally open the vent. This is a very easy modification if you have a sewing machine and some Velcro. Also now each vent can be opened and you can put your hand through the vent to access shirt pockets. Seems like a win-win solution.
Next I opened up the sleeve casing on each sleeve and removed the ½” wide flat elastic. Next sewed two button holes in the casing so that I could thread round elastic through the casing. I threaded the elastic through the casing and out the buttonholes and through a small plastic clamp and tied the ends together. Finally I sewed up the casing where I had removed the stitching to access the flat elastic Now they are totally adjustable. You can open them up for lower arm ventilation. Later I decided the Velcro and adjustable flap was just not needed to I unstitched the flap and the Velcro. I saved the Velcro and used it on the front flap that covers the zipper, which I will discuss below.
Next I tackled the underarm zips. I unstitched from the armpit 8 inches down the arm and from the armpit to 8” down the side torso. I inserted two 8” zippers with the opening both at the arm pit. Wow lots of ventilation now. For the torso zipper I created a wind flap the cover the zipper. I didn't do this for the one under the arm because the arm covers up the zipper unless you are flapping your arms around. This really opens up a lot of ventilation. Maybe too much ventilation, not sure at this time. So under the other arm I just inserted one pit zipper from the pit down the arm. I’ll test it out and see what I like best.
Additional collaboration with t2andreo “Tom” and map pockets on the inside of the jacket that were accessible from outside the Trekker were added to the wish list. The map pockets are on the inside of the Trekker that hang just below the two chest vents. To make these I cut out two strips of nylon fabric 8” wide by 20” long. Using a candle I seared the raw edge on all four sides. I hemmed the two 8” sides by folding over ½ inch and sewing. Then I folded the strip of nylon in half sewed the 9 ½ inch sides of the pocket with a ¼” seam and turned it inside out so the stitching is all inside the pocket. At this point you should have two pockets 7 ½” wide by 9 ½” long. I sewed each pocket to the lower flap of the torso vent. Now to access this pocket you can just pull the Velcro apart in the torso vent and put your hand inside the vent into the pocket. I used non waterproof nylon fabric since it is on the inside of the jacket protected from rain. These will be really handy for holding papers, maps and other small lightweight items.
The last item on the list was to replace the front closure one was zipper with a two way zipper so that the Trekker could be opened on the bottom and closed on the top. I could not locate an appropriate zipper locally but did find one on line. The front closure is redundant with both a zipper and Velcro sealing the wind flap approximately every 8”. Since I didn’t have the correct zipper I just decided to just add more Velcro with additional pieces sewn between every 8” piece that was originally in the Trekker so that I have Velcro every 4” instead of every 8”. This is where I used the Velcro that I removed from the wrists of the Trekker. That way if I want it open at the bottom I can just use the Velcro to seal the upper opening with double the sealing points. I’ll give this a try and if it is OK then just live with the one way zipper.
I tested out the Trekker in a rainstorm. And it is still far from perfect. I did get moisture inside the Trekker from sweating, not from the rain. Mostly in the region of my upper back and I was not wearing my pack so I anticipate this will be a soggy area while walking. I like the pit zips and to be able to open the wrists up completely. Arms and front torso remained dry. The pockets were handy. I tested them out with a MP3 player house keys and phone and they are a great addition to the Trekker.
If you have a sewing machine and basic sewing skills you can give these improvements a try. Thanks to Tom for his great advice on this collaboration.
Check out my other Camino gear sewing project and make yourself a down sleep blanket.
https://www.caminodesantiago.me/com...e-down-blanket-from-recycled-materials.29640/
Laura


(FYI - my daughter wearing my small/med Trekker is 5" 8" tall.)
I had been reading a thread on the Camino de Santiago Forum on “Italian brand poncho, starts with F ... anyone know the brand??” and got to a posting by t2andreo which described the “perfect” rain-gear. It seemed the Trekker included many of the features but was missing out on armpit zippers and a two way zipper for the front closure. It also seemed that good torso ventilation was required for the “perfect” rain-gear and after seeing the Trekker it seemed the ventilation at the front torso could be improved. I also thought the wrists closure should be capable of being totally open or else cinched tight during a downpour. The Trekker had elastic around the wrists as well as Velcro to cinch them tight. But in the open condition they weren't as open as they could be if the elastic was removed. So an additional improvement was to insert an elastic cord with a small clamp so that it could be cinched tight or be totally loose and open at the bottom of the sleeves.
I started with the torso ventilation and wrist ventilation first. The torso vents on either side of the chest are ~8” long on each side but the middle 1/3 was sewed closed leaving just two small vents on each side of the chest. I removed the stitching closing the middle 1/3 of each vent and instead sewed in a 1 1/2 inch piece of Velcro. This would allow me to close the vent or else totally open the vent. This is a very easy modification if you have a sewing machine and some Velcro. Also now each vent can be opened and you can put your hand through the vent to access shirt pockets. Seems like a win-win solution.
Next I opened up the sleeve casing on each sleeve and removed the ½” wide flat elastic. Next sewed two button holes in the casing so that I could thread round elastic through the casing. I threaded the elastic through the casing and out the buttonholes and through a small plastic clamp and tied the ends together. Finally I sewed up the casing where I had removed the stitching to access the flat elastic Now they are totally adjustable. You can open them up for lower arm ventilation. Later I decided the Velcro and adjustable flap was just not needed to I unstitched the flap and the Velcro. I saved the Velcro and used it on the front flap that covers the zipper, which I will discuss below.
Next I tackled the underarm zips. I unstitched from the armpit 8 inches down the arm and from the armpit to 8” down the side torso. I inserted two 8” zippers with the opening both at the arm pit. Wow lots of ventilation now. For the torso zipper I created a wind flap the cover the zipper. I didn't do this for the one under the arm because the arm covers up the zipper unless you are flapping your arms around. This really opens up a lot of ventilation. Maybe too much ventilation, not sure at this time. So under the other arm I just inserted one pit zipper from the pit down the arm. I’ll test it out and see what I like best.
Additional collaboration with t2andreo “Tom” and map pockets on the inside of the jacket that were accessible from outside the Trekker were added to the wish list. The map pockets are on the inside of the Trekker that hang just below the two chest vents. To make these I cut out two strips of nylon fabric 8” wide by 20” long. Using a candle I seared the raw edge on all four sides. I hemmed the two 8” sides by folding over ½ inch and sewing. Then I folded the strip of nylon in half sewed the 9 ½ inch sides of the pocket with a ¼” seam and turned it inside out so the stitching is all inside the pocket. At this point you should have two pockets 7 ½” wide by 9 ½” long. I sewed each pocket to the lower flap of the torso vent. Now to access this pocket you can just pull the Velcro apart in the torso vent and put your hand inside the vent into the pocket. I used non waterproof nylon fabric since it is on the inside of the jacket protected from rain. These will be really handy for holding papers, maps and other small lightweight items.
The last item on the list was to replace the front closure one was zipper with a two way zipper so that the Trekker could be opened on the bottom and closed on the top. I could not locate an appropriate zipper locally but did find one on line. The front closure is redundant with both a zipper and Velcro sealing the wind flap approximately every 8”. Since I didn’t have the correct zipper I just decided to just add more Velcro with additional pieces sewn between every 8” piece that was originally in the Trekker so that I have Velcro every 4” instead of every 8”. This is where I used the Velcro that I removed from the wrists of the Trekker. That way if I want it open at the bottom I can just use the Velcro to seal the upper opening with double the sealing points. I’ll give this a try and if it is OK then just live with the one way zipper.
I tested out the Trekker in a rainstorm. And it is still far from perfect. I did get moisture inside the Trekker from sweating, not from the rain. Mostly in the region of my upper back and I was not wearing my pack so I anticipate this will be a soggy area while walking. I like the pit zips and to be able to open the wrists up completely. Arms and front torso remained dry. The pockets were handy. I tested them out with a MP3 player house keys and phone and they are a great addition to the Trekker.
If you have a sewing machine and basic sewing skills you can give these improvements a try. Thanks to Tom for his great advice on this collaboration.
Check out my other Camino gear sewing project and make yourself a down sleep blanket.
https://www.caminodesantiago.me/com...e-down-blanket-from-recycled-materials.29640/
Laura
(FYI - my daughter wearing my small/med Trekker is 5" 8" tall.)
Last edited: