Please send me your suggestions for backpacks and fitting and proper adjustments.
I do realize that the Camino is no through hike. I have learnt so much in reading and watching material for a though hike for many years. Never pulling the stop when I should have and gone. The knowledge of abilities, gear and survival skills was enormous. I will never get to put them to use. I probably could have used a mule but it wasn’t for me. Too many what ifs. My daughter always scolds me on the “what ifs”.
I know I can walk, hiking is another thing, I know there will be a few places that will feel like a hike and I am looking forward to them just to dream a little but as many have said on the forum, make it your Camino walk. I won’t even have to pretend that the mountains are calling me. What you have told me here, makes me even more focused.
In about a week or so, I should have a list of the necessities I deem I should take and I can have you take a look.
Three questions I have that may be in the FAQs you suggested I read and I will read this evening:
Should I take two credit cards, plus one debit card and how do I get cash in France to start my trip to SJPdP?
How much cash should I have with me daily on the Camino?
Do you have any cell phone ideas for me? My daughter suggested to go with T Mobile and then cancel when I return home.
What you said that was remarkably great for me. . . “And if I had stubbornly clung to that backpacker 'filter' as a Camino walker/pilgrim, than I would have been the problem, not the Camino”.
Thank you so much Dave –
Jo
Hi, Jo...
I'm going to do a re-post of something I have previously written and posted here regarding the methods to properly fit a pack, and then once you have a properly fitted pack, how to adjust it for use. Let me say something which i will reiterate later in that post, when walking adjustments to your backpack will be a dynamic process, not static. In other words, once you first put on your pack and quickly make the adjustments and start walking, you will frequently be wanting to loosen and tighten and re-position and snug up, etc. This is due to how your muscles behave, pressure points that may develop, your backpack shifting around a bit, allowing your shoulder girdle and hips and lower back to evenly accept weight and disperse weight so injury is avoided ---- or the biggie: it just feels better this way
")
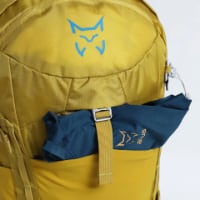
As far as pack recommendations, I can send you a private message with some ideas of packs to try out. Additionally, there are some standard favorites among our female Forum veterans that you might add to a list of packs to try out. You have plenty of time to be as choosy and persnickety about what pack to purchase, so do not rush faster than your ability to accurately assess the best choice for you.
----------------------------------------------------
Things are a trade off. Cost vs weight seems to be the most obvious trade off in a lot of backpacking gear
. IF you are planning to do hundreds of miles a year backpacking or hiking, then the trade off would lean to lighter gear. If one is
not going to become a serious backpacking junkie, then the best strategy is to go with the less expensive gear. Because I have, up til now, averaged 600 to 900 miles of hiking in high mountain areas from Spring until late Fall, all of my gear is either very light or ultra light.
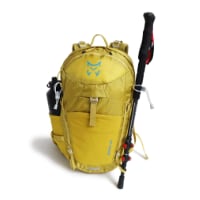
The one other thing that is important to me whether it is my large capacity bag for backpacking trips lasting longer than 10 days - the ULA Catalyst -, or a medium sized bag like the one I use on Camino -- the Gossamer Gear Mariposa; it is whether or not I can take it aboard an aircraft as a carry on.
After a bad experience of an airline losing all of my gear because I had checked my backpack the day before I was due to start a month long backpacking trip, I now always carry on my pack and gear. That's my preference because most of the gear I have is ultralight gear that is not easily replaceable at a lot of sports stores. Please note too, that a lot of others prefer to check their packs and have yet to experience any issues at all.
I mention all of the above as considerations to make if you are ever in the market to purchase another pack.
As you become used to packing and unpacking your pack, all of those straps will become familiar and their use will be second nature. And THAT is the key: practice packing and adjusting your pack often. This is your 'House' while you are on Camino. It will contain your closet, your bedroom, your kitchen, and your storage pantry. Also keep in mind that once you know just how much strap you need for your various adjustments, it is OK to cut them to a more appropriate length. That's normal for experienced backpackers to do. It gets rid of annoying dangley bits and the flapping around that inevitably will occur with a length of unneeded strap material. (just remember to use a lighter to lightly melt and fuse the freshly cut material so that the strap doesn't go all unravely on you.
Correct Sizing of a Backpack
The size of the pack is determined by the length of your spine, not by how much the pack can carry.
Measuring for a correct fit involves determining your spine's proper length. That measurement is done by using a tape measure and measuring from the protruding 'knob' on the back of your neck which is at the base of the cervical spine, to the place on your spine that is even with the top of the crest of your hips.
- Tilt your head forward and feel for the bony bump where the slope of your shoulders meets your neck. This is your 7th cervical (or C7) vertebra—and the top of your torso length.
- On each side of your body, slide your hands down the rib cage to the top of your hip bones (aka the iliac crest). With index fingers pointing forward and thumbs pointing backward, draw an imaginary line between your thumbs. This spot on your lumbar is the bottom of your torso measurement.
- Stand up straight and measure - or have your friend measure - the distance between the C7 and the imaginary line between your thumbs. That’s your torso length.
(
The above instruction set and picture courtesy of REI)

Once you have that measurement in inches or centimeters, you can then look at the backpack manufacturer's sizing guide. This guide will be used to match your spine length, to their stated size range.
Sometimes the sizes are expressed as Small to Extra Large. Sometimes that size scale will combine the sizes like: S/M, M/L, L/XL. When the sizes are combined, it usually means that there is a good amount of adjustability to the frame of the pack to customize the fit. That will usually be in the shoulder harness and the hipbelt so that a fine tuned fit can be achieved.
Here is a good video which will help with fitting. Ignore the reference to the manufacturer as the method is pretty universal.
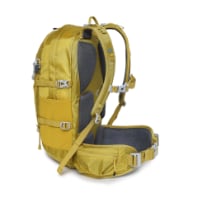
Fitting The Shoulder Harness
First, let me mention that there are differences in the shapes of shoulder straps. The standard shoulder strap shape has been what some manufacturers describe as a "J" shape. This shape tends to fit the chest shape of the male better than the female due to the lesser fullness of the chest. However, even with some men who have bigger chests, the J strap shape can be uncomfortable.
A few manufacturers, ULA and Six Moons Design are the most notable, have developed what is called an "S" shaped strap. This shape has solved many of the fit issues for women, allowing for the straps to properly sit on the shoulders without the uncomfortable compression and chafing due to breasts of larger chests. Here is a link which shows the difference between the two strap shapes:
The shoulder harness should wrap around over your shoulders and sit slightly below the top of the shoulder. The shoulder straps should sit comfortably toward the middle of the shoulder girdle, although that may vary a bit. It should not feel like they are going to slip off your shoulders or sit tight against the base of your neck.
The sternum strap should NOT be required to keep the shoulder straps in place. The sternum strap does connect the shoulder straps, but it is designed to help control where the straps sit on the shoulders with excess pack movement; it is not meant to overcome a poor fit and placement of the shoulder straps.
After fastening the sternum strap in place, pull the adjustment strap until you feel a bit of tension.
The sternum strap on a good pack can adjust up and down on the shoulder straps. The usual placement is somewhere just below the collar bone, but body types and builds will cause a variation of where the sternum strap placement feels best.
Hip Belt Adjustments
For the hip belt, the pad of the belt should sort of 'cradle' the crest of the hip bone: the top of the pad should be slightly above the top of the crest while the bottom of the pad should be slightly below the top. Again, the belt, when it is snugged down, should cradle. The belt should not entirely sit above your hips so that the pad compresses your waist, nor should the entire pad sit below the crest of your hips totally squeezing the hip bones.
There is a lot of misinformation about how a pack's load is distributed between shoulders and hips. It is
NOT true that the waist/hip belt carries the entire load of the pack. It definitely CAN do that, but doing so is undesirable.
There
are reasons which make it necessary to keep the shoulder harness unweighted with the full load weight on the hipbelt. These include damage or injury to the shoulder girdle. There are folks who prefer a total load on the hipbelt even though their shoulder girdle is healthy, but it is a practice which has potential complications associated with it. Even so, it is up to an individual to decide.
If the Hip/waist belt carries the entire weight of the pack
- it means the shoulder harness is unweighted and there can be significant pack movement which, during difficult walking terrain, can create problems with your center of gravity. I have seen people lose their balance and fall as a result.
- It also can result in your core muscles being overworked, stressed and fatigued trying to compensate from that extra movement.
- All of that weight on the pelvis can create significant compression forces by requiring the hipbelt to be over-tightened in order to prevent it from slipping down. This can cause numbness and pain as blood flow and nerve compression is experienced.
- All of the weight on the hipbelt will also place additional strain to the hip sockets and knees.
The load ratio will be about 5 to 15 percent for the shoulders and 85 to 95 percent on the hips. This will allow for the proper engagement of your core muscles to help carry the backpack.
Steps To Adjusting a Backpack Before Walking
I'll add a link to a video (ignore the manufacturer) that shows the best steps to follow when putting on a pack and adjusting it. The basic steps are these:
- Loosen all of the straps on the shoulder harness and hip belt.
- Put on the pack and very slightly tighten the shoulder straps so that the hip belt is slightly below the hips.
- Shrug your shoulders up, and then fasten the waist belt as you are getting it roughly into position.
- Slightly tighten the shoulder straps to assist with the hip belt adjustment.
- Position the hip belt padding to let the padding sit half above and half below the crest of the hips. The padding of the belt should never sit entirely above the hips. The padding should sort of wrap itself over the top of the hip bone and hug the hips.
- Tighten the belt just enough to keep it in position. At this point, nearly 100% of the packs weight is resting on the hips.
- Snug the shoulder straps to take up 5 to 15 percent of the packs weight. You will feel just a slight unloading of the weight off the hips.
- At the top of the shoulder straps and toward the pack, are smaller straps called 'load lifters'. Grasp them and pull to your front. You will feel the weight of the pack lift up slightly and pull more snugly toward your back. This helps with center of gravity and balance. You can experiment with how snug or how loose you want to pull on the straps. A properly adjusted load lifter strap will form a sort of 45 degree angle when viewed from the side.
- On some waist/hip belts there can be a small strap connected to each side of the belt. Again, pulling forward on those straps will bring the bottom of the pack closer to your back, helping with balance as you are walking.
It is important to remember that after you make the first pack adjustment before starting to walk, that you will frequently be changing those adjustments while walking: tightening, loosening, pulling, having the pack higher or lower....
Pack adjustments are a dynamic thing, not a static thing. As you walk, how the pack feels, pressure points, center of gravity, etc WILL change. This is why it is important to become so familiar with your pack that making adjustments becomes second nature as you walk, requiring no real thought or consideration.
A good pack, loaded and adjusted properly will be so integrated to your body while walking that you sometimes forget you are wearing it. Now, NOTHING will make a weighted load in a pack disappear, but it will help keep that load from becoming an agonizing exercise in torture